How to Manage Photos for Your Self Published Book
Biff Barnes
Self publishing authors who are working on manuscripts often try to mix two steps of the process of creating a book – writing and book design. This is unfortunate, not to mention often frustrating. What happens is that these authors try to format their books in Microsoft Word and place their photos as they create their manuscript. When they edit the text the photos move from the spot they were originally placed. Word 2010 is better than previous versions, but the reality is that it’s not a tool for book design. A printer will ultimately require a manuscript designed in Adobe Creative Suite’s InDesign software. So let’s look at a better way to manage your photos as you create your book.

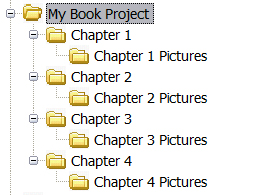
First, separate text from images by placing them in different folders. One folder contains only the text of your manuscript for each chapter and one only the images. (See illustration.) Assign a number to each photo.
Next, indicate in your text document where you want to place specific photos. An easy way to do this is to put three percentage signs (%%%) at the point in the text where you want to place a photo. Following the symbols simply add Photo #32 to indicate the image that belongs there. When it is time to create the book in InDesign it is very easy to use the Find/Replace tool to locate each photo placement and to insert the appropriate image and caption.
Whether you do your own work in InDesign or work with a professional book designer as most self publishing authors do you’ll save yourself a lot of frustration and time by using this system to manage your photos.